Word clouds (tag clouds) are used to provide an overview of text in image form, in which the size of each word indicates its importance or frequency. In this article, we are going to see how to create beautiful word clouds in Python. Word clouds can be used to provide an overview of the data or to simply create an artwork. In this article we are going to see how to create a word cloud, how to use image mask and how to color text.
Installing the package
First, lets install the wordcloud package.
#if you are using pip:
pip install wordcloud

#if you are using anaconda
conda install -c conda-forge wordcloud
Importing the libraries
Let’s import the libraries that will be required. We’ll also create an example text for which we are going to generate the word cloud.
import numpy as np
from PIL import Image # if you don't have it, you'll need to install it

import matplotlib.pyplot as plt
from wordcloud import WordCloud, STOPWORDS, ImageColorGenerator

# We'll be generating word cloud for this text; triple quotes for multi-line string
text = """I see you gather before me...hungry...terrified... Clutching your babies to your chest. Emperor Emhyr his marched his legions into our lands... Laid siege to every fortress from here to the Blue Mountains. Rabid and ravenous, he bites and bites away. Men of the North, you stand at the precipice. Your kings have failed you, so now you turn to the gods! And yet you do not plead? You do not kneel to dust your heads with ash? Instead you wail, "Why have the gods forsaken us?" We must look into the trials we failed long ago! In a time passed, our world intertwined with another through an upheaval scholars call the Conjunction of the Spheres... The gods allowed unholy forces to slip into our domain. The offspring of that cataclysm was the neferious force called magic... Yet we did not banish it, instead studying the vile arcane for our power and wealth! And the monsters at our door...the unholy relicts of this Conjunction? ...the trolls...the corpse eaters...the werewolves? Did we raise our swords against them? Or have we laid this burden on others? On so-called witchers? Stray children taught the ways of foul sorcery, their bodies mutated through blasphemous ritual. Sent to fight monsters though they could not distinguish good from evil.
The flicker of humanity long extinguished within them. Yes, their numbers have dwindled through the years. But a few still roam our lands, offering their bloody work for coin. To this day they shame us with their very existence! The North bleeds, flogged by war. The battles are the gods' whip, chastisement for our sins! And let us not forget the terrors, the scourges from beyond our world! The Wild Hunt rides the sky with every full moon! The dark raiders abduct our children into lands unknown! Some say they herald a second Conjunction! Can we chart a course back into the light? Will we find the strength to banish the mages from our kingdoms? Unite around the warmth of the Eternal Fire? Nigh is the Time of the Sword and the Axe! None will fight this war in our stead! Nigh is the Time of Madness and Disdain!"""
Creating the WordCloud
In this step, we are going to create a minimal word cloud. This word cloud might not be the best, but it requires the least configuration and serves the purpose of demonstration.
# Create and generate a word cloud image:
wordcloud = WordCloud().generate(text)

# Display the generated image:
plt.figure()
plt.imshow(wordcloud, interpolation='bilinear')
plt.axis("off")
plt.show()
Output:
 The wordcloud object has a function generate, which takes text as input and generates a wordcloud that is passed to the matplotlib to generate a figure. Right now, our output figure is really small, but we have many parameters available that be used to customize the word cloud. Complete arguments of the wordcloud object are given below:
# arguments for WordClould object with their default values
WordCloud(font_path=None, width=400, height=200, margin=2, ranks_only=None,
            prefer_horizontal=0.9, mask=None, scale=1, color_func=None, max_words=200, min_font_size=4,
            stopwords=None, random_state=None, background_color='black', max_font_size=None, font_step=1,
            mode='RGB', relative_scaling='auto', regexp=None, collocations=True, colormap=None,
            normalize_plurals=True, contour_width=0, contour_color='black', repeat=False, include_numbers=False,
            min_word_length=0).generate(text)
Using Filter Image
In this section, we customize our word cloud and also use filters/ masks images. Images to be used as filters should have white background, transparent background won’t work. Its better to work with PNG format because of its lossless nature meaning it won’t have shades that can mess up the filter a little. Also we’ll take colors of the text from the image by utlizing recolor function from wordcloud object.
First let’s create a mask from image.
witcher_mask = np.array(Image.open("./witcher.png"))
witcher_mask.shape
After the mask is created, lets use it to create our word cloud. You can download the image I am using for the mask by right clicking on it. We set the mask parameter of the word cloud object. In order to alter the height and width of the output figure, we have to provide height and width to it, plt.figure(figsize=[20,15]) is doing that. We are provided 20 inches width and 15 inches height.
# Create a word cloud image
wc_2 = WordCloud(background_color="white", mask = witcher_mask, width = 1600, height = 900).generate(text)

# Generating colors from image
image_colors = ImageColorGenerator(witcher_mask)

# show
plt.figure(figsize=[20,15]) # height, width in inches
plt.imshow(wc_2.recolor(color_func=image_colors), interpolation ='bilinear') # Using the color function here
plt.axis("off")
plt.show()
Output:

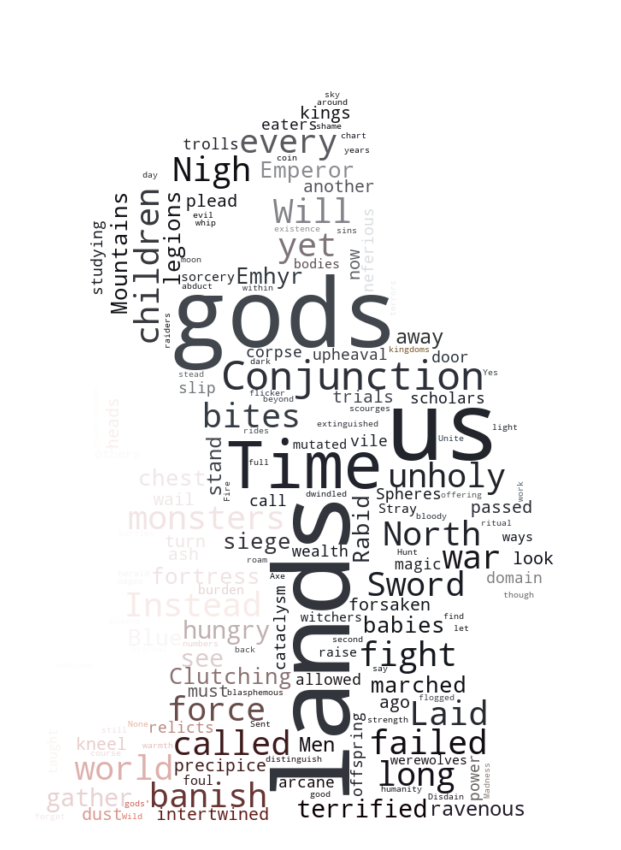
Note the aspect ratio of these images is not actual because stylings are being applied on them.
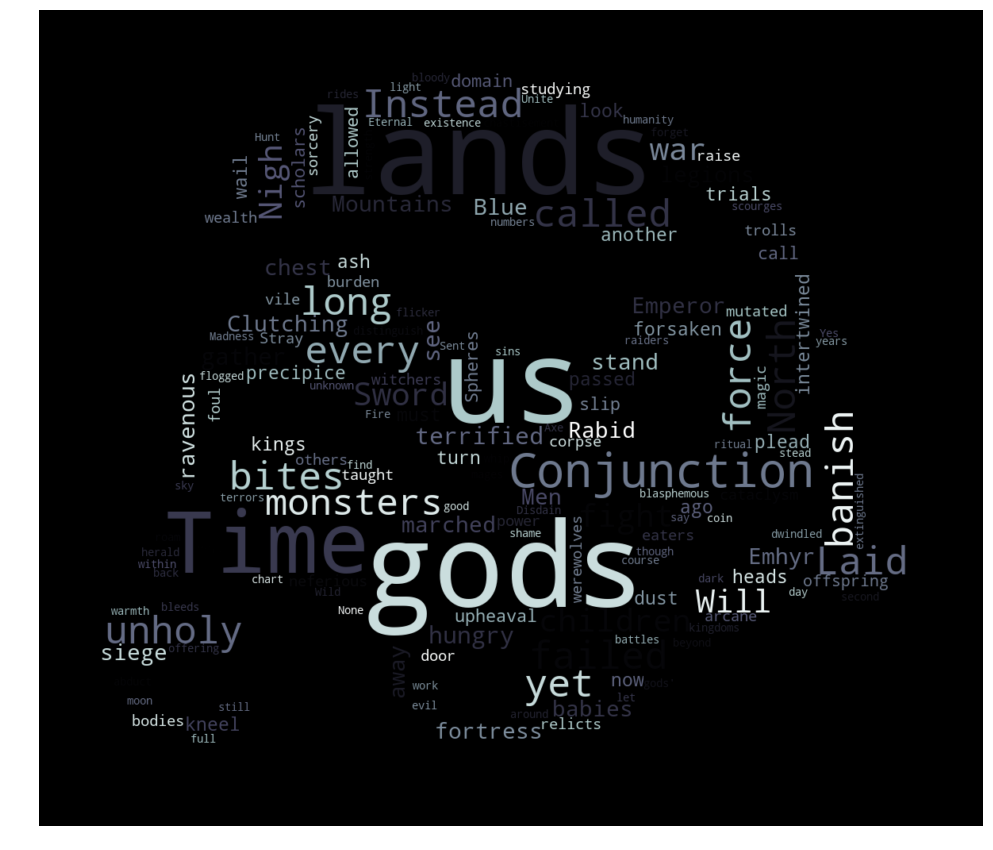
Using Other Colors
If we don’t want to use the colors from image, we have options of using other color sets. These color sets are already defined in matplotlib library. The default color set that is applied, if we don’t provide color function is “viridis”. The complete list of all the available color sets and their details is available at Matplotlib color maps. There are many differnt color sets available like gray, shades of green etc. So you don’t have to create a color set in most of the cases.
This time, lets create a mask of storm tropper with grayish colors.
stormtrooper_mask = np.array(Image.open("./stormtrooper_mask.png"))
stormtrooper_mask.shape
We’ll use black blackground. Then we are going to recolor using predefined color set from matplotlib, its name is bone, you can check it and more on the matplotlib docs. We simply pass the name of the color set, random_state sets the seed for color. If we are using 1, then we’ll have the same output. There is also alpha transparency of textm, you can alter it if you like.
# Create a word cloud image
wc_3 = WordCloud(background_color = "black", mask=stormtrooper_mask, width = 1600, height = 900).generate(text)

# show
plt.figure(figsize=[20,15])
plt.imshow( wc_3.recolor(colormap = 'bone', random_state = 1), alpha = 1 , interpolation='bilinear')
plt.axis("off")
plt.show()
Output:
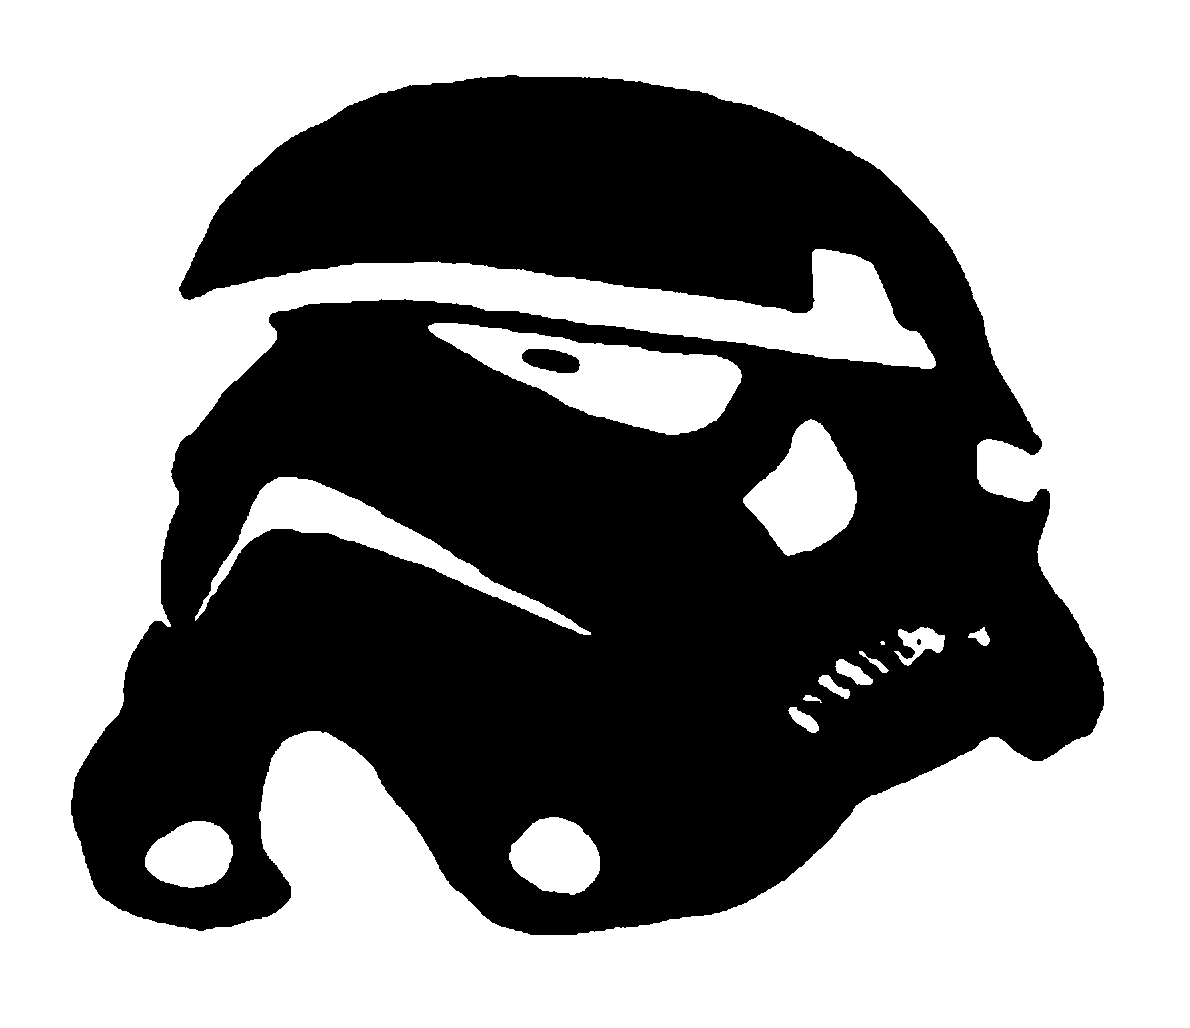
You can download the stormtropper mask by the same method as before, simply right click on it and select save.
Alright, this concludes our section for word cloud. If there is something that I missed or if there is a question, kindly let me know.